Learn how to prune orchids for healthy and beautiful blooms. Follow our step-by-step guide to keep your orchids thriving and vibrant.
Pruning orchids can be a daunting task, but with the right techniques, it becomes a rewarding process that promotes healthier, more vibrant blooms. This guide will walk you through the essential steps to prune your orchids correctly, ensuring their beauty and longevity.
Why Pruning Is Crucial for Orchids
Pruning is vital for maintaining the health and aesthetics of your orchids. By removing dead or diseased parts, you encourage new growth, reduce the risk of infections, and improve overall plant vigor.

Benefits of Proper Orchid Pruning
- Stimulates Growth: Eliminates unnecessary energy expenditure on unhealthy parts.
- Prevents Disease: Reduces chances of fungal or bacterial infections.
- Enhances Appearance: Promotes tidy, lush, and well-maintained plants.
According to a study by Horticultural Research, proper pruning can improve flowering by 25%
Tools Needed for Pruning Orchids
Before you start, gather the following tools:
- Sterilized pruning shears or scissors
- A pair of gloves
- Rubbing alcohol or a disinfectant solution
Always ensure your tools are clean to prevent the spread of diseases.
Step-by-Step Guide to Pruning Orchids
Learn more about How and When to Prune Hydrangeas.
1. Assess the Orchid’s Condition
Begin by observing your orchid. Look for any dead or yellowing leaves, spent flower spikes, or signs of disease.
- Healthy Orchids: Green, firm leaves and vibrant roots.
- Unhealthy Signs: Yellowing, wilting, or mushy roots.
2. Remove Spent Flower Spikes
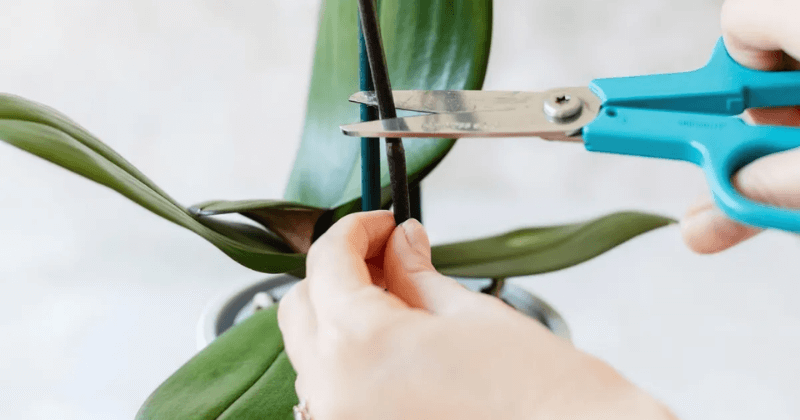
Cut back flower spikes to redirect energy to the plant’s growth:
- If the spike is green: Trim just above the node to encourage a potential new bloom.
- If the spike is brown or dried: Remove it completely at the base.
3. Trim Dead or Damaged Leaves
Cut off any leaves that are discolored, wilted, or showing signs of disease. Always make a clean cut at the base of the leaf.
4. Address Root Health
Inspect the roots, especially if you’re repotting:
- Remove any mushy, brown, or dried-out roots.
- Keep healthy, green, or white roots intact.
5. Sterilize Tools After Each Cut
To avoid spreading potential infections, disinfect your tools after each cut by wiping them with rubbing alcohol.
Post-Pruning Orchid Care
After pruning, your orchid needs proper care to recover and thrive:
- Watering: Maintain a consistent watering schedule based on your orchid type.
- Fertilizing: Use an orchid-specific fertilizer to boost growth.
- Lighting: Ensure the plant receives adequate indirect sunlight.
Common Mistakes to Avoid
- Over-pruning: Removing too much can stress the plant.
- Using dirty tools: Increases risk of infections.
- Ignoring signs of root rot: Can compromise the orchid’s health.
FAQ: Pruning Orchids
How often should I prune my orchids?
Prune orchids after the flowering season or when you notice dead or damaged parts. Regular assessment ensures timely pruning.
Can I propagate orchids from cut flower spikes?
While not all orchid types can be propagated this way, some, like Phalaenopsis, may produce keikis (baby plants) on trimmed spikes.
What should I do if my orchid’s roots are mushy?
Remove the damaged roots and repot the orchid in fresh, well-draining orchid mix.
